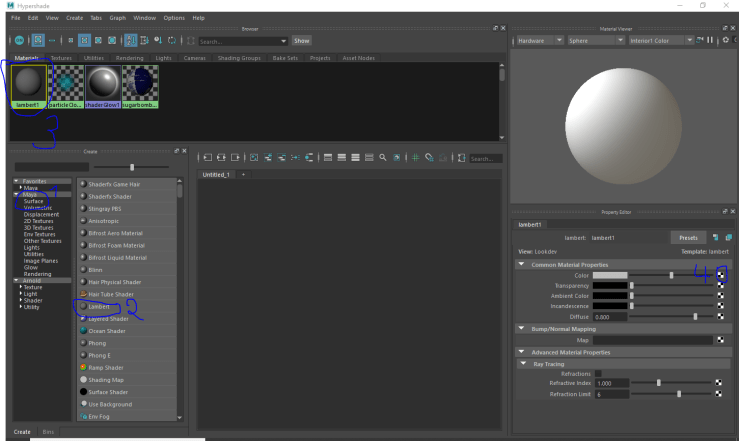
Hypershade is the engine in Maya that allows the creator to asign shades to an object adn change its color, reflection, transparency, etc.
The three common materials:
Blinn: Is a shader that is particularly effective at simulating metallic surfaces (ex: brass or aluminum)
Lambert: Is a shader that represents matte surfaces (such as chalk, matte paint, unpolished surfaces).
Phong: Is a shader that represents glassy or glossy surfaces (such as car moldings, telephones, bathroom fittings).
Maya material editing options
Asign New Material: Adds a new material to your object by holding RMB and clicking on the option.
Asign Existing Material: Adds an existing material that you have selected, created and edited, to your object.
Asign Favorite Material: Adds a favourite or recently used material to your object.
Sugar Bombs
We created and textured a box with a cereal label on it. In order to do that we had to create the shader for the object first and add our picture referance. We did that by going over to Dysplay Hypershade Window, go to surface and select a new material. After that go to the right side of the screen to the color and click the button next to it.

After that a new window will pop up and I had to add a texture so I chose the File option.

After that the interface on the bottom right side of the screen changes slightly and in order to be able to chose your texture file you have to click on the yellow folder, after that you just choose your file.
After that I created a rectangle and added the material with the Cereal texture added to it. But my job wasn’t done yet because the textures were all over the place , so i had to move and place the faces on the apropriate texture portion. The UV editor is at the top right side of the screen.

Once you opened the UV editor you get to place your faces on the apropriate parts of the object, and after that you’re done, you have your virtual cereal box.

